8 of Our Favourite Kitchen Island Design Ideas

8 of Our Favourite Kitchen Island Design Ideas

Centred in the middle of the kitchen, kitchen islands are not only aesthetically pleasing, but they also foster a sense of togetherness. A kitchen island provide a place for family and friends to gather around and socialize while others prepare a meal. Islands are also handy storage space for your different cooking and cleaning supplies. After all, you want your kitchen to maintain a polished and uncluttered look.

A captivating kitchen island design is important to both the kitchen’s feel and functionality. If your current kitchen island doesn’t make the cut, or if you’re looking to add an island to your kitchen, check out our 8 favourite kitchen island designs below:
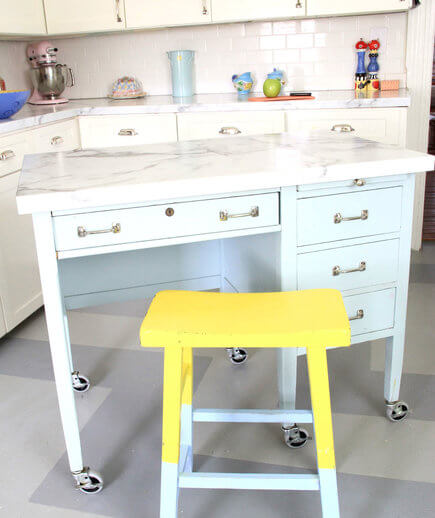
8 of Our Favourite Kitchen Island Design Ideas - Transform a Desk

Image Credit

Go antique chic

Are you considering a kitchen remodel with an old-fashioned rustic feel? Consider a more simple approach to your island by repurposing an old table, desk or bureau. Head to antique stores or thrift stores in your area and select a piece that complements your vision for the room.

A dark oak dining room table with fold-down sides could serve as an ideal sitting area and workstation, as can a larger desk or coffee table. It’s even possible to add to the piece yourself to make it more accommodating. For example, according to a recommendation by Country Living, you could create extra shelves for a repurposed table by using planks of wood, or you could even add a quartz countertop to an old table for a striking old-meets-new aesthetic.

8 of Our Favourite Kitchen Island Design Ideas - Microwave in Kitchen Island

Image Credit

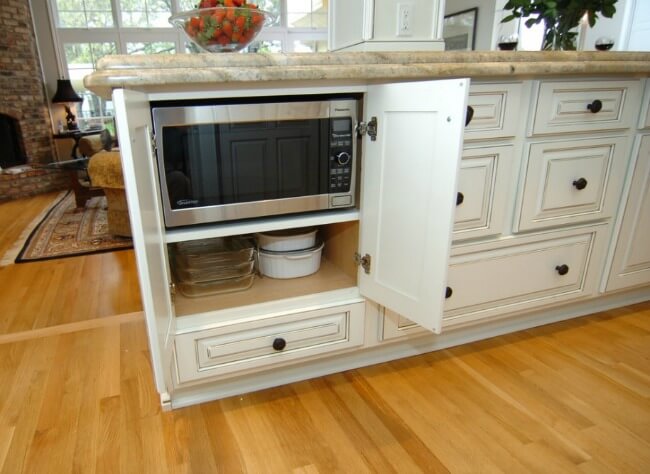
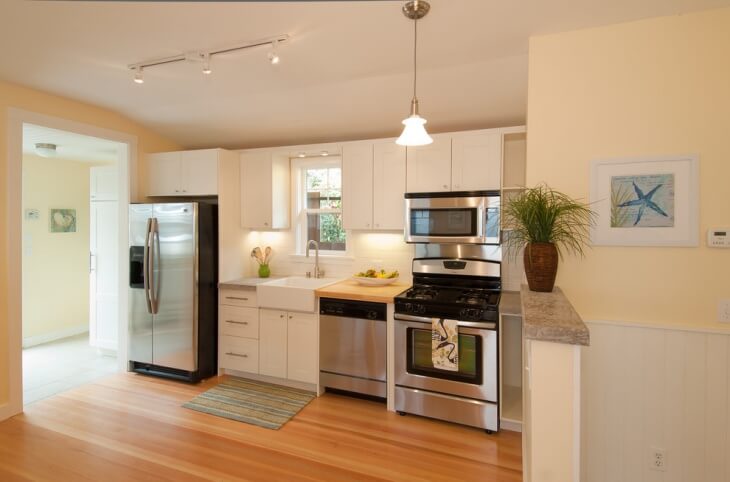
Hide your appliances

Do you find that appliances like your microwave and toaster take away from the ‘less is more’ feel of your kitchen design? If so, consider using this fantastic kitchen island tip from This Old House: have your island built to hold appliances either on the sides of the structure or on shelves in the bottom.

For example, you could have your microwave placed into one end of the island and drawers in the centre to hold utensils and appliances such as your toaster and coffee grinder.
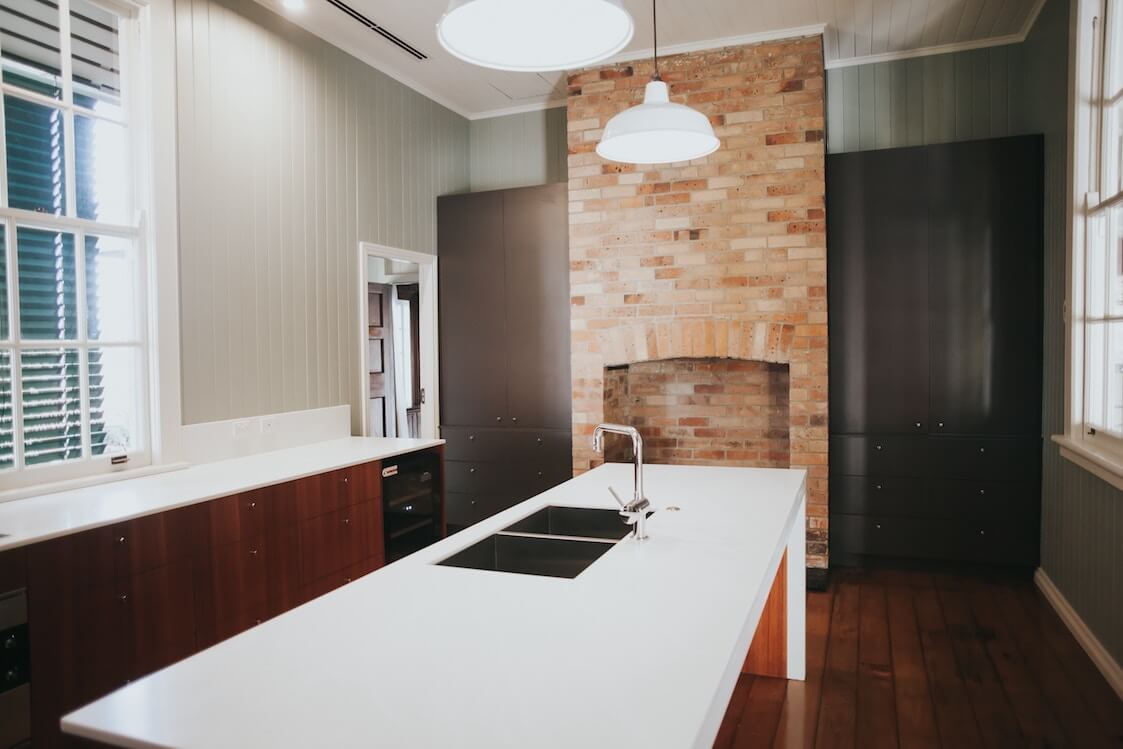
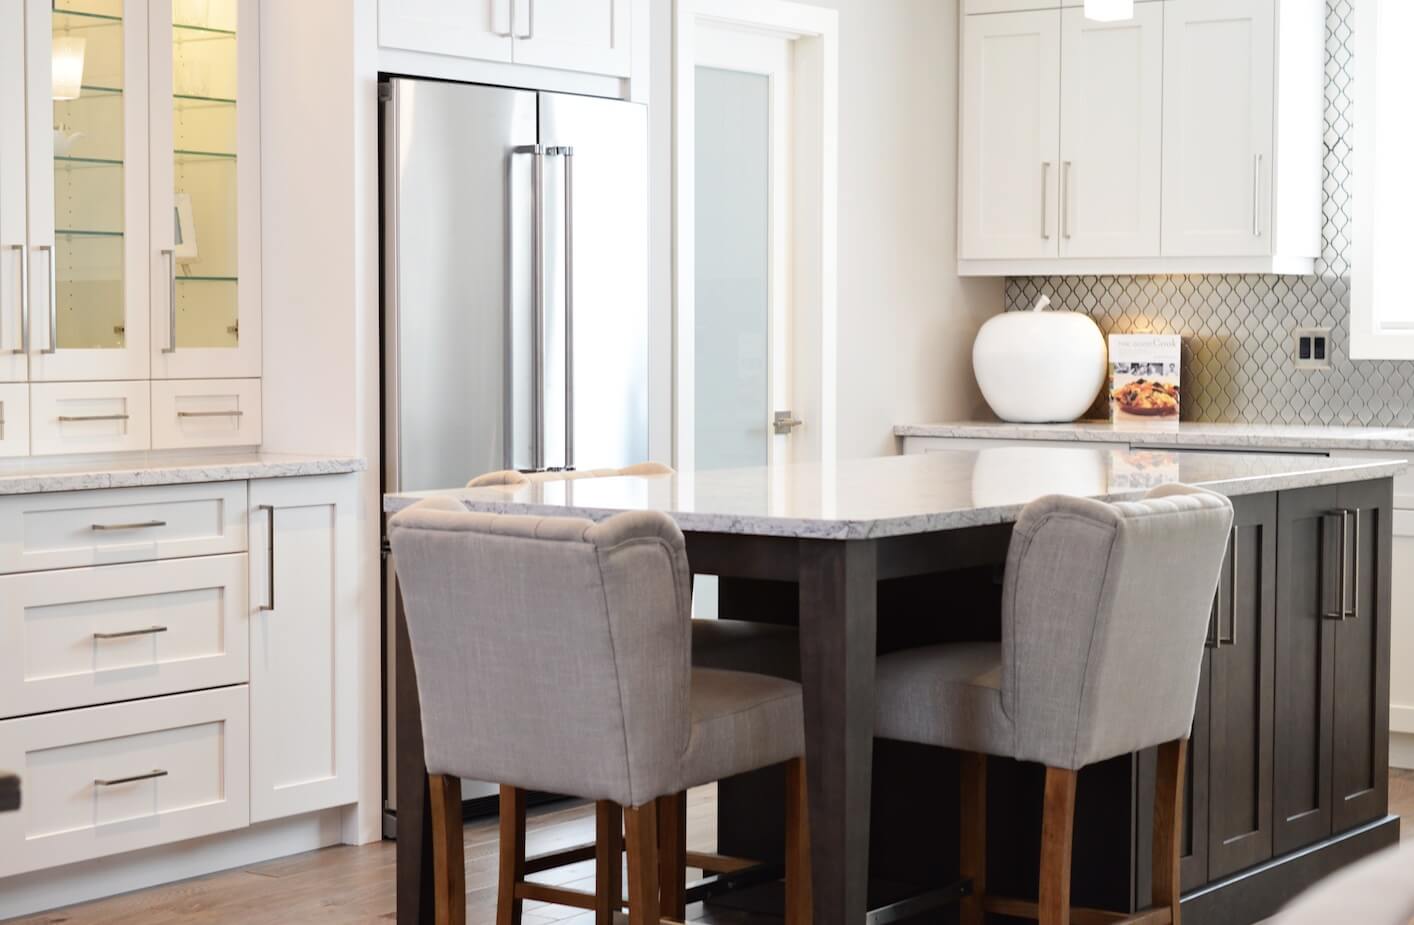
8 of Our Favourite Kitchen Island Design Ideas - Open Kitchen Island

Image Credit

An Open Space

It’s rare to find a kitchen island with an open space underneath. Most islands are designed with utensil and appliance storage in mind. However, as This Old House noted, open space under a kitchen island can be a perfect place to keep your bar stools in the event of a party or large gathering. If room permits, you could even design your island to incorporate kitchen cabinets and drawers on one end, keeping an empty space on the other for the seats to be placed.

8 of Our Favourite Kitchen Island Design Ideas - Classic Kitchen Island

Image Credit

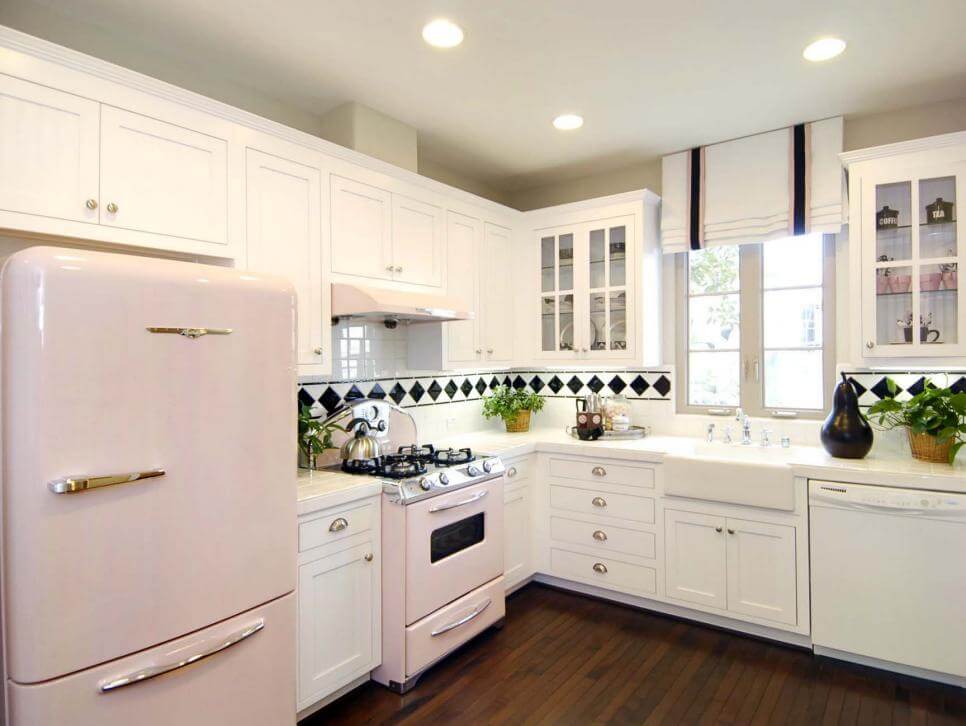
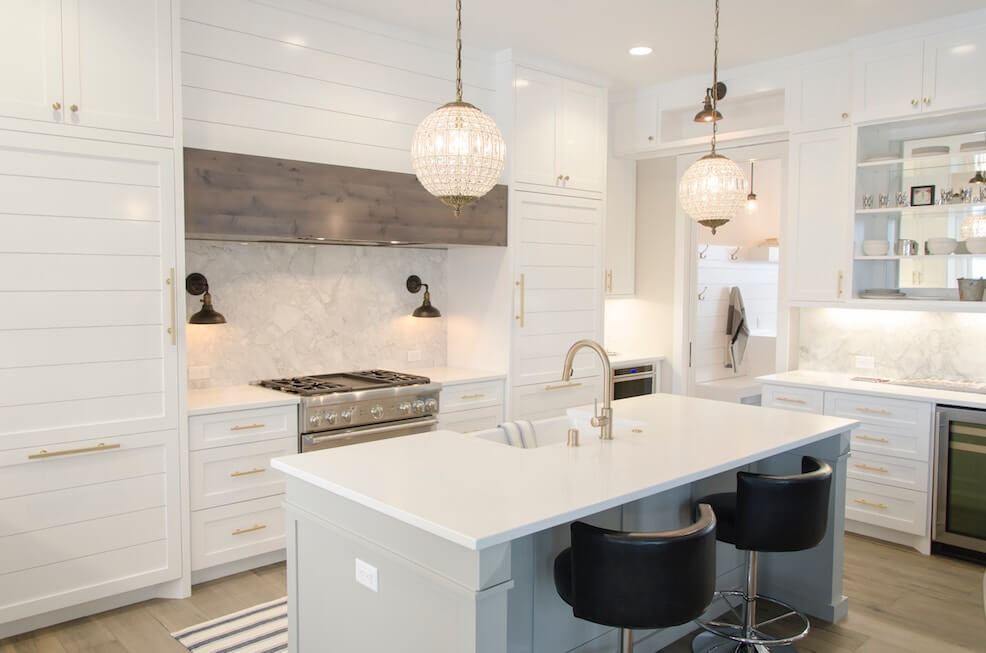
Consider Something Classic

To create a more classic and uniform kitchen island, have your kitchen stools lined up on one side. Keep the other side free of furniture so you can move around, access drawers and cupboards and prepare food. You could even opt to install a sink to make the area even more functional.

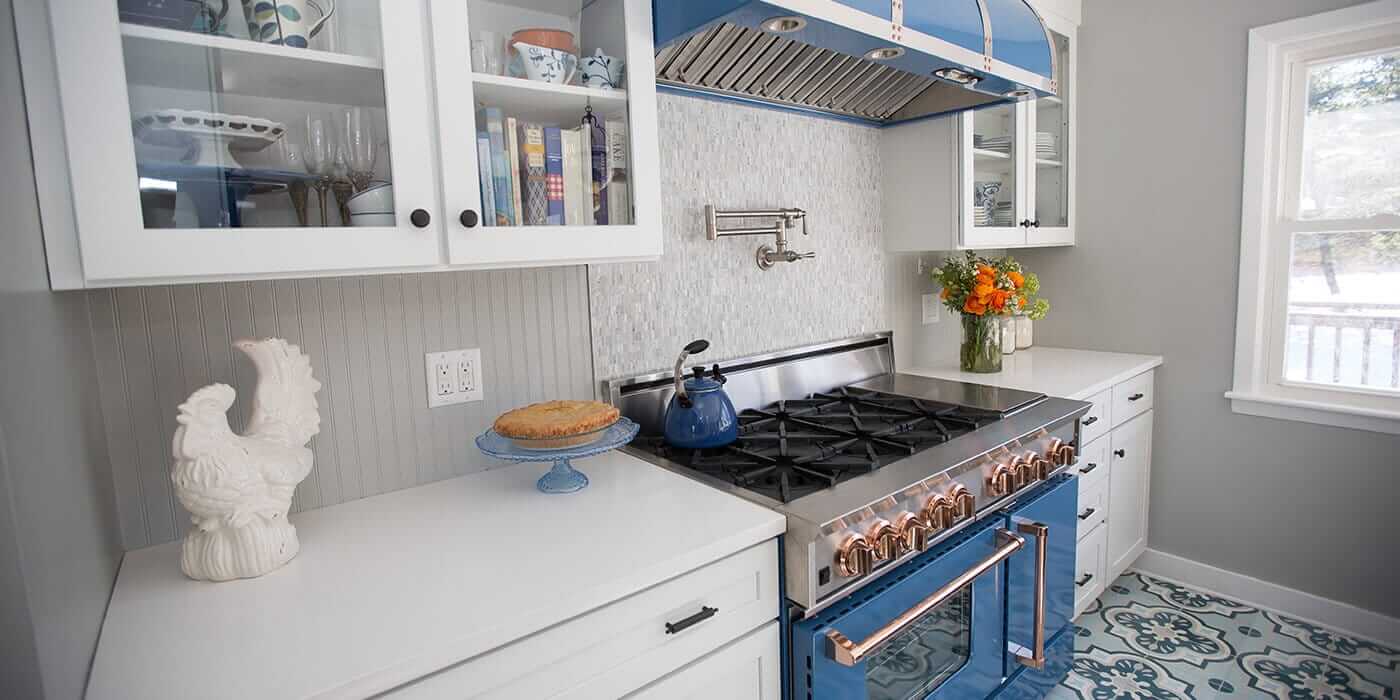
For the countertop, Country Living suggested using a grey material, such as quartz or granite. Then, opt for a muted yet stylish colour for the bottom drawers and cabinets – think a shade of cream or a light sky blue.
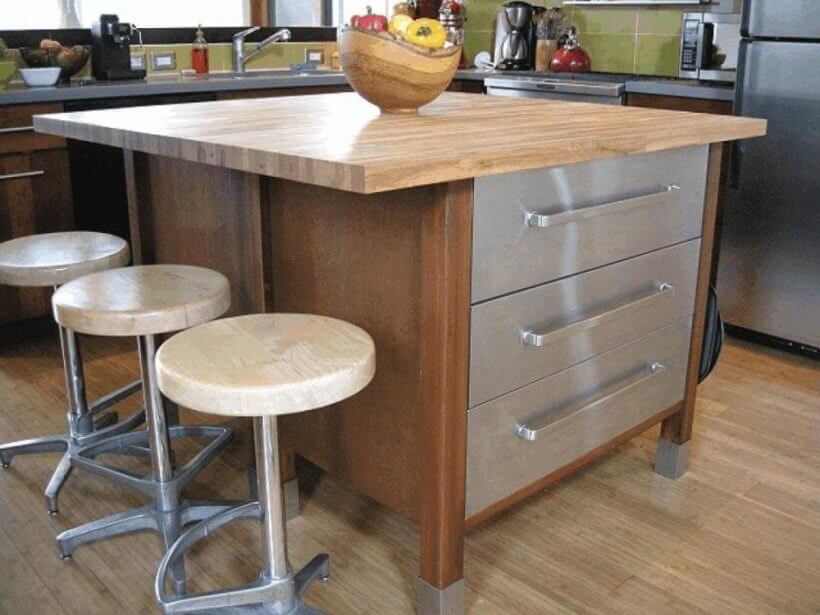
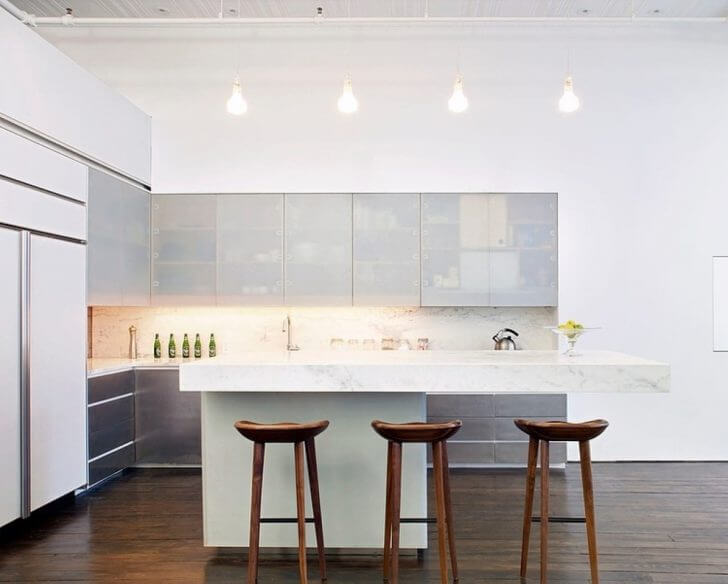
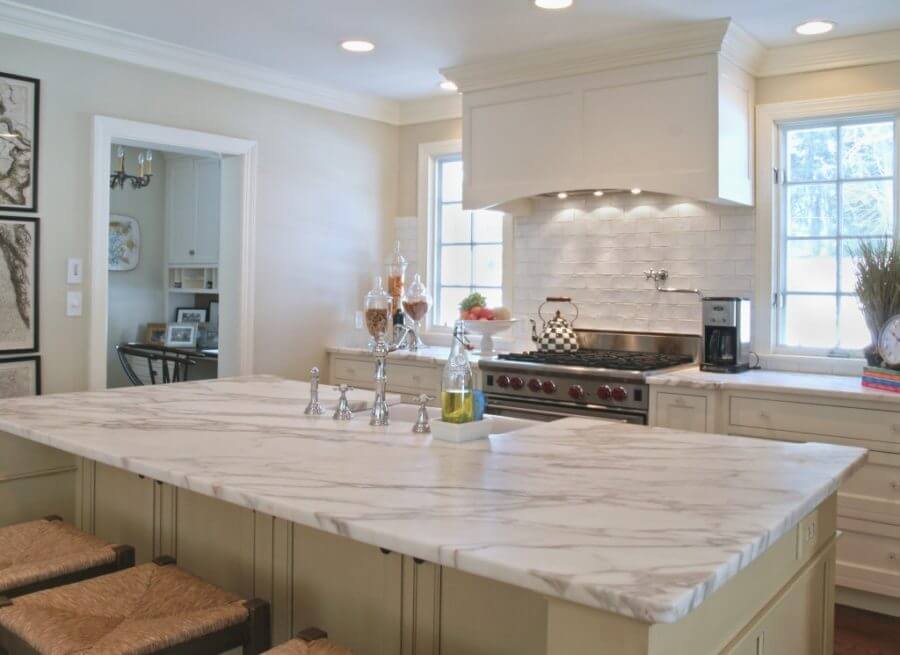
8 of Our Favourite Kitchen Island Design Ideas - Wood and Metal Island

Image Credit

Mix Your Materials

As pointed out by Elle Decor, a major trend in kitchen design this year has been the move toward rooms that incorporate varying styles for a more bohemian and relaxed look. If you are aiming for an eclectic feel to your kitchen space, start with the island.

Houzz reported on a kitchen island design that blends materials in the form of a wood countertop and stainless steel drawers—a strong contrast that commands attention and complements a controlled chaos vibe. The same approach can also be applied to the seating that surrounds the island. Select a mix of kitchen stools of varying design and color, or for an even bolder look choose an assortment of different chairs.

8 of Our Favourite Kitchen Island Design Ideas - Multi Level Kitchen Island

Image Credit

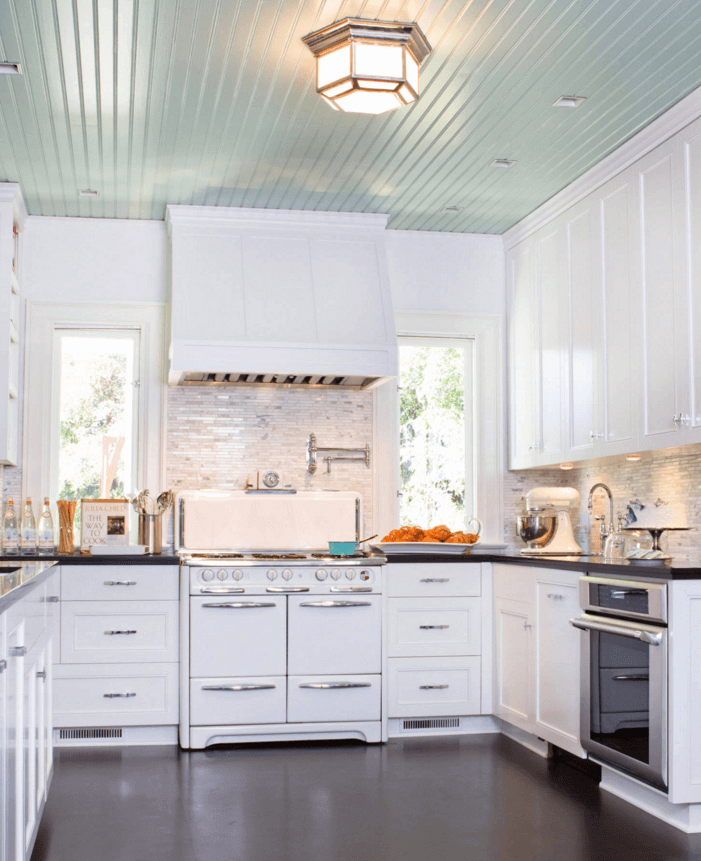
Create Multiple Levels

To create a more dynamic kitchen island, add another level. Creating a variation in the height of your island will allow you to use surfaces for multiple purposes. Whether it’s eating or prepping food, a multi-level kitchen island will make the surfaces feel like two completely different spaces. For example, try incorporating a higher tier to add an appliance like a sink or stove to one level. Then create a breakfast bar on a higher level or tier.
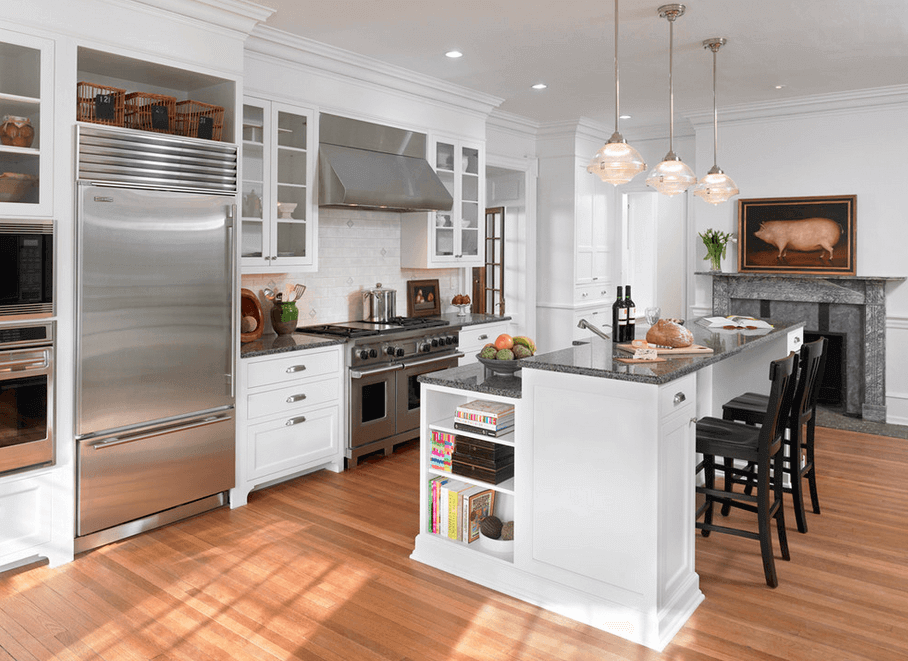
8 of Our Favourite Kitchen Island Design Ideas - Kitchen Island Storage

Image Credit

Add More Storage

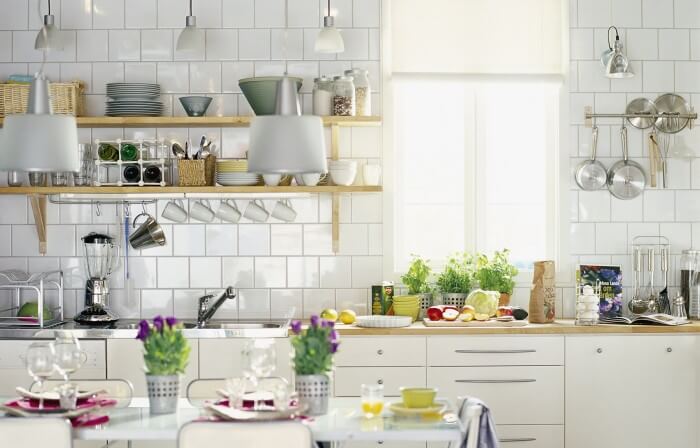
Sure, a kitchen island can be used to create more counter space on top. But they can also feature more storage space underneath. Use your kitchen island to store dishes, pots and pans within easy reach. Or, keep those items and appliances you use less often tucked away and out of sight.

Even if you have a small kitchen island, adding more storage to the island can help you avoid having a disorderly kitchen. Do you frequently find your kitchen cluttered? Maybe you don’t have enough space to stash necessities? Try adding more storage by using drawers, cupboards and shelves.

This kitchen island design is not only practical, however. It can also be used to create a captivating look. Another option is to add kitchen island storage as a way to display certain items if you use open shelving. For example, exhibit your wines or perhaps cookbooks on open shelves.

8 of Our Favourite Kitchen Island Design Ideas - Waterfall Countertops

Image Credit

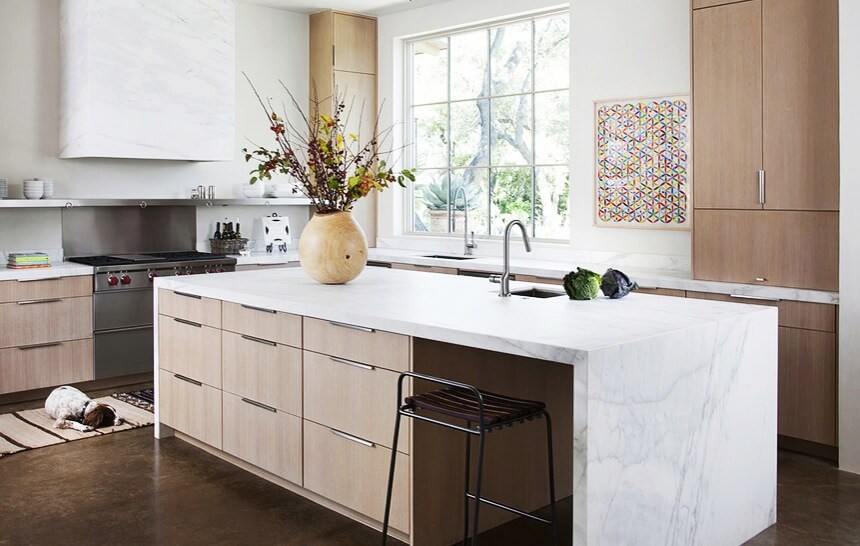
Top it Off With Waterfall Countertops

The trend of kitchen islands with waterfall tops isn’t going anywhere anytime soon. But, that’s a good thing. Waterfall kitchen island countertops fit any kitchen design and style and add a refined touch. You can try adding a kitchen island waterfall countertop in plenty of materials—granite, concrete, glass, wood, quartz countertop — you name it!

What are your kitchen island plans? For help with your new kitchen island design or a kitchen renovation, head to a Kitchen and Bath Classics showroom near you and chat with our experts!

4 Glaring Signs It’s Time For a Clean, New Bathtub

4 Glaring Signs It's Time For a Clean, New Bathtub

There are plenty of stressors in life — work, family, and day-to-day activities can wear you out quickly. Having a clean, inviting bathtub to come home to at the end of a long day is one way to ease your worries and relax your body. But is your tub cutting it? Maybe it’s time for a new bathtub!

It can be hard to know when you’re due for a bathroom remodelling, but waiting too long can be an issue. At the same time, a new bathroom can be perfect for adding a bit of luxury in your home. Your bathtub is one of the most important parts of your bathroom’s character and usefulness.

By looking for these signs, you can know when it’s time for an upgrade:

4 Glaring Signs It's Time For a Clean, New Bathtub - Bathtub Cracking or Leaking

Image Credit

1. Your Bathtub is Leaking or Cracking

One of the most obvious — and potentially serious — reasons it may be time for a new bathtub is that you’re experiencing leaks in your current tub. At best, this can just lead to water on the bathroom floor. If you have a serious issue, however, you could be at risk for expensive repairs. Fill the tub and plug the drain. If the water level drops, you may have a leaky bathtub.

A leaky bathtub could mean you have a small crack in the basin or even a leak in the pipes under the bathtub. HomeAdvisor stated that especially bad leaks could cause damage to the ceiling below the bathtub. You can also damage drywall and other parts of your home, leading to very costly and difficult mitigation. Since leaks only get worse, you should replace your bathtub as soon as you notice a leak.

4 Glaring Signs It's Time For a Clean, New Bathtub - Hard Water Stain

Image Credit

2. It is Dirty and Stained

There are multiple reasons why a dirty bathtub likely needs to be replaced. Obviously, stains are unappealing. And aside from discouraging your family from taking a relaxing bath, a stained bathtub can create a large eyesore for your entire bathroom.

Regular upkeep can minimize the possibility of unsightly marks, but if they sit for too long, they can become irreversible. For this reason, bathtubs should be sanitized often. But if your bathtub is past the point of no return and you can’t remove that unsightly ring, it’s time for an upgrade!

Your dirty tub could also be harbouring mold, mildew and bacteria. This isn’t just disgusting, but also unsafe. Kudzu reported that illness, allergic reaction, or skin problems can result from an unsanitary tub. Once again, this is reason for prioritizing cleaning on a weekly basis. Unfortunately, if you are inconsistent about this task, mold or mildew can take over your tub. When it builds up, it can be very tricky to get rid of.

If a stained bathtub is a regular issue for you as a result of hard water, you might want to think about opting for a darker enamelled bathtub. This will help to hide the discolouration when you go shopping for a new tub.

4 Glaring Signs It's Time For a Clean, New Bathtub

Image Credit

3. You Just Want a New Bathtub

Aside from being hygienic and meant to keep you clean, bathtubs are also soothing and a place to relax. Are you having trouble getting in and out of your bathtub? Perhaps it’s simply uncomfortable or not big enough. Maybe it’s in an awkward position in your bathroom. Whatever the reason is, it may be time to break out your wallet and purchase a new bathtub that works for you and your family.

If you have trouble getting in and out of your bathtub, you may want to consider installing a walk in bathtub or even a handicap accessible bathtub. If you’re struggling to place a traditional bathtub in your bathroom, why not consider a corner bathtub?

4 Glaring Signs It's Time For a Clean, New Bathtub - Luxury

Image Credit

4. You’re Ready For an Indulgence

Beyond a dirty or aging tub, there are plenty of reasons for you to consider making an upgrade. Your tub is the focal point of your bathroom and does a lot to carry a sense of style. Visitors will gush at a luxurious new bathtub installation and will just as quickly notice a tub full of soap scum and stains.

By installing one of the newest, most modern models available, you can give your entire bathroom an appreciated new character. Look into clawfoot tubs for a classic, elegant touch. Or, if you’re your standard size tub isn’t cutting it, perhaps purchase a luxurious Jacuzzi tub.

Your tub is also one of the best places to unwind. But this isn’t true if it’s constantly leaks or if it’s full of old stains. At the same time, new tubs have an assortment of relaxing features that melt away stress and give you a much-needed moment of zen. A splash of bath salts and just the right temperature can give you a well-deserved escape just down the hall.

Ready to upgrade your bathroom and replace your lackluster tub with a new bathtub you dream of soaking in? Head to a Kitchen and Bath Classics showroom to look for the newest bathtubs available by Maax tubs, American standard bathtubs and more!

7 of the Most Popular Kitchen Layout Options for Your Home

7 of the Most Popular Kitchen Layout Options for Your Home

Your kitchen layout can make or break the functionality of your kitchen. So, it’s important to consider your options before you undertake a kitchen remodel. Since kitchens get so much daily use, choosing the right design that makes it easy for the entire family to work and cook is key. This has, in turn, brought about a host of new design features and innovations to expand the functionality of the average kitchen.

“We have gone from the traditional kitchen, where one person prepared meals, to a multi-purpose room and a multiple-cook room, and this evolution has changed us from looking at one work triangle to multiple triangles, or ‘zones,’” Mary Jo Peterson, principal of Mary Jo Peterson Inc., told HGTV.  “With that in mind, we have to increase clearances and look at adding comfortable spaces in the kitchen.”

Here are a few of the most popular kitchen layouts and kitchen design shapes and why they might be right for you:

7 Popular Kitchen Layout Options

7 of the Most Popular Kitchen Layout Options for Your Home - Zone Design

Image Credit

1. Zone Design

A “zone design” breaks the kitchen up into distinct “zones”. For a zone design, kitchen layouts are partially separated by counters, islands and other decor. This means a separate workstation exists for cooking, eating and even cleaning in these kitchens. So, there’s plenty of room for several helpers to be in the room at once. Typically, this layout designates an area for socializing as well. But, cooking is usually given the bulk of the space, to ensure that cooks have as wide a berth as possible.

7 of the Most Popular Kitchen Layout Options for Your Home - One Wall Kitchen

Image Credit

2. One-Wall

Popularized in response to the constraints of studio or loft apartments, “one-wall” designs—often referred to as a “Pullman kitchen”—orient all cooking appliances, dishwashers, surfaces and kitchen cabinets around a single wall as the hub of the kitchen. This basic kitchen style evolves the space into more of a galley with a walk-through corridor.

Small kitchen layouts can really benefit from basic one-wall layouts, as this design is the ultimate space saver. A centre island often accompanies one-wall kitchen layouts. However, this island is more typically used as a surface on which to eat meals rather than featuring cooking or cleaning appliances.

7 of the Most Popular Kitchen Layout Options for Your Home - Galley Kitchen

Image Credit

3. Galley or Corridor Style

To enhance small kitchens, or if you find that your kitchen is more narrow, a galley kitchen—also known as a corridor kitchen—can help make the most of the space. The galley or corridor-style kitchen is made up of two straight runs parallel to each other.

These kitchen designs tend to forgo any seating or eating surfaces, instead simply utilizing a hallway layout. Cooking and cleaning appliances like ovens, refrigerators, sinks, etc. live on either side. For example, in most instances, if the sink is on one side, then the stove will be on the opposite side.

If you only have a one-wall design kitchen layout but want a galley or corridor-style kitchen, don’t worry. You can transform a one-wall design into a galley or corridor by simply adding and island. Place the island on the opposite side of the wall of cabinets and ta-da! You’ve got yourself a galley kitchen. The island will also help add extra storage that can be lost in an open kitchen design, which is only limited to wall cabinet storage.

Before you decide to go for a galley-style kitchen layout, think about how many cooks and helpers you usually have in your kitchen at a time. The drawback of this kitchen style is that it can be tight working quarters for multiple cooks.

7 of the Most Popular Kitchen Layout Options for Your Home - L-Shaped Kitchen

Image Credit

4. L-Shaped

Similar to a galley-style kitchen, L-shaped kitchens utilize corridors but are also built along part—if not all—of another wall. This kitchen layout has a main wall of cabinets with either the sink or a stove with a shorter run of cabinets. Altogether, these elements go together to create an L-configuration.

The result of this L-shaped kitchen layout is a more open version of the galley style, typically with an inner area that has room for seating. The L-shaped kitchen allows for more interaction with friends, family and guests, especially if you have an L-shaped kitchen with an island.

7 of the Most Popular Kitchen Layout Options for Your Home - U-Shaped Kitchen

Image Credit

5. U-Shaped or Horseshoe

U-shaped kitchens are essentially two L-shaped kitchen layout designs facing each other in a mirrored fashion. This design provides expansive counter and storage space, allowing for a great amount of flexibility in a kitchen with this layout.

U-shaped or horseshoe-shaped kitchens also include a central island. The island automatically becomes the focal point of the room, allowing for cooking and cleaning to occur on one side while schoolwork and eating can take place on the other. This design has great cooking versatility and functionality, with the added benefit of creating a distinctive “flow” for the kitchen.

Another option for this design is to add another leg. This will create a G-shape kitchen layout, which is similar to the basic U but with the additional leg. G-shape kitchens are great for homes with one-cook, as it allows enough space for work to be spread out.

7 of the Most Popular Kitchen Layout Options for Your Home - Kitchen Work Triangle

Image Credit

6. Work Triangle

You’re probably aware of the work triangle kitchen floor plans, since they are frequently talked about when it comes to popular kitchen designs. The three points of this kitchen layout lie at the stove, the sink, and the refrigerator.  Try using the classic shapes of the kitchen to break up appliances in this kitchen layout. For instance, perhaps place the cook top and wall ovens in different areas. Another idea for a work triangle kitchen design is to include two sinks. This is a must-have if you often find yourself with two cooks in your kitchen.

7 of the Most Popular Kitchen Layout Options for Your Home - Peninsula Kitchen

Image Credit

7. Peninsula Kitchen

A kitchen with a peninsula includes a connecting island. Basically, this style uses a peninsula to convert an L-shaped layout into a horseshoe. Or, this kitchen layout can use the peninsula to turn a horseshoe kitchen into a G-shaped kitchen design.

The peninsula in a peninsula kitchen acts as an island. Unlike normal kitchen islands, the peninsulas offer more clearance in kitchens that don’t allow ample square footage to hold a true kitchen island.

What kitchen layout interests you the most? If you’re not sure what design would best fit your home and family, or if you just need a little more inspiration and tips, visit a Kitchen & Bath Classics showroom today!

12 Elements to Include in Your Rustic Bathroom Retreat

Whether your home is hidden in the woods, situated in the suburbs, or part of an urban jungle, rustic bathroom designs can add a touch of flair to any home. But making the most private room in your home feel a little bit more woodsy and country doesn’t mean it can’t be practical as well. If you’re looking for rustic bathroom décor, but you’re struggling to find functional pieces, you’re in luck.

Here are 12 ways to transform your bathroom into a rustic yet functional space:

farmhouse sink in bathroom

Image Credit

1. Farmhouse-style basin sink

Replacing your traditional sink with an antique – or styled to look distressed – copper basin can evoke a sense of history and the outdoor lifestyle.

2. Mason jar light fixtures

Try lighting up your bathroom with Mason jar light fixtures. Adding Mason jar vanity lights is a simple and easy way to incorporate rustic décor into your bathroom designs.

To create the look, use planks of wood cut to your desired length and stain them. Then, drill holes for wiring, and cover the hole with plumbing fixtures. Next, feed chains to hang the lights from through the plumbing pipe, which support the weight of the Mason jars. Lastly, add the Mason jars and lights blubs, and you’re good to go!

3. Antique armoires

While modern styles tend to incorporate storage functionality in less showy ways, something like an antique armoire can give you a place to store towels and toiletries. Simple chicken wire fronting can help limit the build-up of moisture as well.

4. Pallet wood mirror (with storage!)

Every bathroom needs a unique mirror. Having a mirror with added storage space makes this piece even more functional. The pallet wood is what will bring the rustic design to this piece. Use a mirror framed with weathered lumber. Look for or create a mirror that resembles a window with a traditional “window box.” The box is where you can store what you need to get ready in front of the mirror.

Rustic bathroom with bathtub in front of large window

Image Credit

5. Undermount bath in front of a large window

Does your master bathroom window overlook a wooded, rustic scene? Evoke the feeling of a ski chateau or cabin in the woods by installing an undermounted bathtub right next to the window.

6. Paint cabinets and walls grey

Painting bathroom cabinets and walls grey not only makes for a cohesive look, but it’s also an easy way to create a rustic bathroom. Pick a soft hue, and start painting!

7. Open wood shelving

If you want a rustic or country bathroom while also remaining functional, add open wood shelving to the bathroom. Open wood shelving will dress up a drab bathroom and add easily accessible storage.

Check out recycled and weathered pallet or create wood. Both of which can be used to build charming shelves to store your various toiletries. If you want to give the wood even more character, stain it. Choose a stain that accents your bathroom décor and apply it to the wood.

8. Showcase oxidization and rust

Part of the rustic charm is that not everything has to gleam like new. A distressed gilded mirror frame, metal flashings designed to look like rust, even a naturally stained and oxidized faucet can give your bathroom a lived-in look.

9. Vintage luxury

For something more high-end and luxurious, look to the touches of class from yesteryear: A slipper tub and small chandelier can evoke a bygone era while remaining relatively inexpensive in modern times.

10. Plank shelves with industrial hardware

Simple and functional, adding plank shelves with industrial hardware is a great way to create a rustic bathroom. For the industrial hardware pieces, try using plumbing hardware and pipes. These pieces can be assembled and installed as the brackets for the wood top of the shelves.

Plank shelves are practical for bathroom storage, as they can be built in any size and installed anywhere on the walls. To make plank shelves with industrial hardware even more unique, paint the plumbing pipe with spray paint for metal.

Reclaimed wood towel holder

Image Credit

11. Reclaimed wood towel holder

While we’re on the topic of practical wood pieces for a rustic bathroom, let’s talk about using reclaimed wood for a towel holder. For this, attach two different sizes of wood planks, one on top of the other. Then, use a simple antique iron door handle to act as a towel holder. While a simple piece, this towel hook will add more character to your rustic bathroom designs. Plus, every bathroom needs somewhere to hang a towel anyway!

12. Barn-style doors

Using barn doors can bring out rustic and country bathroom vibes. Using a sliding barn-style door makes this rustic décor even more functional. According to Jeremy Van Wagoner, a remodelling specialist and owner of Pinnacle Remodeling, many homeowners are opting for barn style sliding doors between the bedroom and bathroom instead of the traditional swinging doors.

“These kinds of barn doors are becoming really popular,” Van Wagoner told the Billings Gazette.

There you have it, 12 tips to create a rustic bathroom while also keeping things functional. Get started on your rustic bathroom designs today by visiting a Kitchen & Bath Classics showroom.

12 Unique and Inspired Bathroom Mirror Ideas You’ll Love

Bathroom Mirror Ideas

The mirror is a focal point of your bathroom. So, use your bathroom mirror to do more than reflect just your appearance, but to also reflect your overall design style.

Whether it’s to help you in putting on makeup, brushing your teeth, putting in your contacts or styling your hair, a good mirror is a bathroom essential. With that in mind, here are a few inspired ways you can make your mirrors a unique and attractive feature of your bathroom, reflecting your personal style:

Choose an unconventional shape for your bathroom mirror

Image Credit

1. Choose an Unconventional Shape

Beautiful bathroom mirrors don’t have to just be round or square – they can be whatever shape fits your personality! Don’t hold back. Everything from a heart-shaped mirror in a honeymoon suite or an ornately decorated oval in a guest bath, your mirror can act as a statement about your taste rather than simply what is trendy or popular.

Double bathroom mirrors

Image Credit

2. Double It Up

Create a bathroom that’s twice as nice. Even if you only have a single sink, pairing two mirrors can be a great way to reduce congestion in a bathroom you share with your spouse. You don’t need to stop there, though. Try duplicating the style even three times for a unique bathroom mirror look. The more, the merrier!

Vintage bathroom mirrors

Image Credit

3. Go Vintage or Vintage-Inspired

Mirrors that evoke the decor of a bygone era can be a stylish addition to your bathroom. Vintage or vintage-inspired décor pieces can form the foundation of a retro bathroom design. Even the spider-webbing rust and discolouration that often happens with older mirrors can be turned into a feature.

Mirror over window

Image Credit

4. Mirrors Over the Window

It might sound crazy, but a narrow, long mirror mounted over a bathroom window – allowing light to pass through on the top and on bottom – is a funky way to take advantage of natural light.

Mixed and matched bathroom mirrors

Image Credit

5. Mixed and Matched Mirror Sizes

Having one large central mirror over your sink is always a good design engineering move, but adding different sizes and shapes with smaller mirrors can prove both stylish and functional.

Collect a few different styles and/or sizes of mirrors and hang them in your bathroom for a unique look. Place them on the wall in a gallery-wall-style arrangement, and keep them all on one wall to avoid a funhouse effect. Be sure the bathroom mirrors vary and compliment each other. You don’t want the mirrors to be competing.

Backlit bathroom mirror

Image Credit

6. Backlight Mirrors

Sometimes having an overhead or bulb light can be a bit too harsh. Why not try backlighting your mirrors using strips of LED? These lights come in a variety of different tones and colours. Backlighting is perfect for applying makeup and seeing small facial details.

Gilded bathroom mirror

Image Credit

7. Gilded Mirrors

If you want a lux look, go for gilded mirrors. A gold trim can add a touch of brightness, shimmer and elegance to a mirror.

Mirror over bathtub in washroom

Image Credit

8. Don’t Stop at the Sink

Who says that you can only place a vanity mirror over the sink? Consider framing your sink with multiple mirrors, which is all the better for capturing alternative angles, making it easier to get your outfit or overall look just right. These can even make your bathroom appear more spacious through an optical illusion.

You can even place a large statement mirror over your bathtub! Just make sure to avoid angles that capture less visually attractive aspects of the bathroom, like the toilet.

Bathroom mirror reflection

Image Credit

9. Mount Artwork That Plays with Reflections

Feeling playful? Try putting up paintings or artwork that feature backwards text or only half of a figure. When mounted next to a mirror, the reflection can become part of the art!

Mirror on exposed brick

Image Credit

10. Go Simple with Rock and Exposed Brick

If your bathroom wall uses rough hewn rock or exposed brick, keeping your mirrors simple and frameless is ideal to compliment the natural look.

Vertical bathroom mirror

Image Credit

11. Long and Lean

A long, lean vertical mirror works well with long shower curtains and paintings that lengthen the feel of a small bathroom.

Suspended bathroom mirror

Image Credit

12. Suspend It

Rather than the traditional mounting, why not try something funky and off-beat? While most mirrors are hung on a wall, you have other options for hanging a washroom mirror. Try suspending your bathroom mirror. Or, for an informal look, try just having a mirror resting on a narrow shelf.

To suspend a bathroom mirror, use a visible rope or wire to hang the mirror. Take a look at various materials and choose your favourite to hang the mirror from. For instance, you could use a thick rope, creating a nautical-look, or opt for a more modern vibe by using wire. Whatever you choose, make sure it’s secure!


The humble bathroom mirror is an important element of your overall design. Once you choose the right vanity mirror for your bathroom, you’ll need to complete the look. Want some help choosing lighting, faucets, toilets or other elements to finish off your bathroom design? The experts at Kitchen & Bath Classics showrooms are here to lend a hand. Stop by today to learn more.

Gas vs Electric Stove: Which New Stove is Right For You?

Gas vs Electric Stove

Are you a lover of tradition, or do you feel yourself drawn to something more modern? When you’re looking for a new stove, it can be tricky to determine which look is right for your kitchen. But, the debate extends even further. How does the stove generate heat?

For stoves, there are two main choices when it comes to heat: electric or gas. Electric stoves run off your home’s grid, while gas stoves have to be tapped into a supply of either propane or natural gas. When designing a new kitchen, various elements may dictate if you’re able to opt for gas stoves, such as existing natural gas or propane hookup in the house, or whether you have space for a propane tank. But assuming you can get a gas stove, should you?

The guide below will tell you everything you need to know about the gas vs electric stove debate.

Electric vs Gas Stove - Electric Stove

Image Credit

Electric Stove Pros

Easy to clean

First thing’s first, electric stoves are often much easier to clean than gas stoves. Some electric stoves feature a simple smooth-top, flat glass plane that can be wiped down with a sponge or rag after use.

Quick activation and precise heating

Electric stoves are a quick and simple option, as they activate with the push of a button and heat up quickly. After activating the stove, the heat is distributed evenly across the electric burner surface. This means there’s no need to worry about defective igniters or clogged fuel lines. The heat of an electric stove is also more precise and is able to dial in to a specific temperature much easier and more accurately than gas stove alternatives.

Durable and stable

When it comes to the durability of gas and electric stoves, the electric stove takes the win. Are you new to cooking or a seasoned pro? If you’re an amateur, your best new stove option would probably be an electric one. Smooth top electric stoves are flatter and more stable, which means they’re able to support the weight of full pots and saucepans without needing to precariously balance them. This can be a big help for less advanced or young cooks.

Versatile

Electric stoves are versatile and can be manufactured in a variety of shapes and sizes. This kind of stove can also be installed virtually anywhere as long as there is an electrical outlet.

Sleek appearance

If you’re looking for a stylish stove, you’ll likely want one that’s electric. Electric stoves on the market have a sleek, glass countertop. This look can enhance the style of the stove itself, and modernize your kitchen.

Low installation costs

Not only are electric stoves pretty simple to operate, but they’re also less expensive to have installed. If you don’t spend much time in the kitchen, the low installation cost could be a reason to opt for a stove with an electric burner.

Storage space

Additional storage space is usually available beneath the ovens on electric stoves. This is an advantage that gas stove options don’t have.

Electric Stove Cons

Higher costs

On average, electric stoves cost slightly more than gas stoves. The natural gas used for gas stoves is almost always cheaper than electricity. However, if you’re not cooking often, you won’t see much of a cost difference for running the stoves. Electric stoves prices range between $650 and $2,800, while you can find gas stoves for about $800 to $2,300.

Less reliable and not as durable

Since electric stoves rely on power, during a blackout, your stove will be rendered unusable. The glass range on top of an electric stove is also less durable than a cast iron gas counterpart.

Slower heating

Another con of electric stoves is that they take more time to heat up. Are you always looking for food to be ready in a hurry? In general, gas stoves heat to full temperature quicker and also cook food faster, so consider your time when picking out a new stove.

Staining

If you’re looking for a baking haven, you might want to rethink purchasing a new stove with an electric burner. Removing spilled sugar from the glass top of an electric stove after it’s heated up is incredibly difficult. These glass tops also stain easily, which can create an eyesore.

Electric vs Gas Stove - Gas Stove

Image Credit

Gas Stove Pros

Faster and more even cooking

When it comes to the gas vs electric stove decision, which will help produce better food? In most cases, the answer is gas stoves. The cooking is perhaps the biggest pro to using a gas stove over an electric one.

Because gas stove flames spread themselves along the bottom and sides of a pan, food cooks faster and more evenly over the open flame on the gas stove. You can also char and toast food with a gas stove, which isn’t an option with electric stoves.

Lower operating cost

If you’re already using natural gas in your home and don’t need to pay for the gas to be set up, a gas stove may be the best option for you when it comes to costs. Gas stoves are less expensive than electric stoves to operate—anywhere between 10 and 30 percent less on average, according to Bob Vila. Both propane and natural gas cost less than the equivalent amount of electricity.

Faster heating

In contrast with electric stoves, gas stoves heat up quickly. When you turn on a gas stove, you’ll see an instant, constant and adjustable flame. The flame allows you to reach the temperature you are looking for soon after ignition.

A visible flame

Since you can see the flame on a gas stove, you don’t need to worry about the stove being left on or off—you’ll know.

Gas Stove Cons

Open flames

If you’re concerned about having open flames in your kitchen, a gas stove isn’t for you. Because you’re dealing with open flames, gas stoves can be more dangerous and more likely to cause fires. The gas component of the stove can also leak and is toxic if left to build up.

Costly hookups

Typically, gas stoves are more expensive to buy and have set up than electric stoves. Combined with the need to buy or rent your own propane tank and have it regularly serviced and refueled, gas stove costs can add up over time.

There’s no right answer as to what the perfect stove will be. So, simply go with something that matches your needs and your budget. Now that you have all the info, you tell us, which side are you on when it comes to a gas vs electric stove?

Still can’t choose a side of the gas vs electric stove debate? Stop by a Kitchen & Bath Classics showroom today, and we’ll help you make a decision.

Avoid These Common Kitchen Renovation Mistakes

Common kitchen renovation mistakes

Your kitchen is likely the centre of your home. It’s the place where your culinary skills shine, where you gather as a family, and where guests inevitably congregate. A kitchen can be a unique expression of your design sensibilities, but in creating your new space it can be easy to make common mistakes. To ensure that you don’t have any costly errors in judgment, here are some common issues to avoid with a kitchen renovation.

kitchen triangle

Image Credit

Not planning the workflow

Keep in mind that your kitchen isn’t just a free and open space. Above all else, it needs to be functional and easy to navigate when preparing food. Your kitchen’s busiest areas are the sink, stove, and refrigerator. Make sure these areas and appliances are in an efficient location that is relevant to one another.

Martha Stewart urges homeowners redesigning their kitchens to picture their ideal cooking workflow and accommodate that space. She specifically says to observe the “work triangle” of the sink, refrigerator, and stove, making sure that each point in the workflow is easily accessible. A great kitchen starts with a great kitchen layout.

Ignoring modern trends

Trends affect more than just the appearance of your kitchen. Whether you want to achieve a classic, traditional or contemporary look, don’t forget that your kitchen has to be functional. Today’s kitchen appliance trends are not only pleasing to the eye but often improve the overall flow of your space. Furthermore, modern stoves, dishwashers, and sinks can offer significant efficiency upgrades and often take up less space.

For example, double ovens not only look great, they provide a main oven at the perfect height and a secondary oven for plate warming and additional baking. Separating the ovens from the burners also allows you to have a cooktop in a kitchen island or elsewhere and opens up new floor-plan possibilities.

Trying to fit too much in a small space

Just because you’re kitchen isn’t grand with space to spare, doesn’t mean it can’t be amazing. As with many areas of your home, it’s essential to make the most of the space you have. From space-saving appliances to storage space to wall-mounted storage, a small kitchen design doesn’t mean you have to sacrifice having the kitchen of your dreams.

Remember storage in a kitchen renovation

Image Credit

Forgetting about storage space

Easy to access storage should be a priority for any kitchen renovation. If you’re installing new cabinets, work with a designer or kitchen planner to make sure that every bit of space is used wisely.

For example, do you have enough space near your dishwasher to keep all your dishes together, or will you have to make multiple trips across your kitchen to unload the dishwasher? Would a pantry be practical? Would you prefer drawers or cupboards for storing pots and pans? Could a lazy Susan be useful in the corner? Storage space can have a huge impact on the overall flow of your kitchen.

Giving up counter space

A kitchen isn’t a kitchen without counter space. It’s your prep station, where the kids will do their homework and even where the family may sit down for a less formal meal. From the material you choose to the depth of your counters to adding an island, counter space is never a waste of space. You may even want to consider a multi-level island or a small office space off to the side.

Budget is king

Image Credit

Ignoring your budget

Every renovation should start with a budget, and a kitchen is no exception. Creating — and sticking to — a budget is an essential part of your remodel. Start by deciding what features of your kitchen are the most important, and allocate your finances accordingly. Consider things such as countertops, cabinets, appliances, flooring, and backsplashes. Kitchen renovation costs can add up quickly, so start with a budget and be sure to add some wiggle room.

Disregarding Lighting

As with every room in your home, lighting sets a mood. You want your kitchen to feel bright and inspiring. If you have natural light then you’re one step ahead, but that doesn’t mean you can forget about additional light. Recessed lighting is a great option for brightening up your kitchen and ensuring that countertops are well light. Track lighting allows you to direct light towards a specific task area. Island lights are not only practical but are a great opportunity to add some decorative appeal.

Doing it alone

There’s not getting around it, a kitchen renovation is complicated. It requires knowledge of electrical, plumbing and design. Make sure you have a consultation with a licensed, certified contractor before you start major work. They’ll be able to flag any concerns or obstacles, and will likely even be able to provide some advice. Always trust the experts when it comes to renovating and getting your appliances installed.

Stop by your local Kitchen & Bath Classics branch to get a sense of what kind of styles and options are available. Their team of experts can help you develop a budget and start planning the kitchen of your dreams.

12 Ways to Make a White Kitchen Design Work in Your Home

Want a kitchen with a bright and clean feel? Yes, please! Projecting the feeling of brightness and cleanliness, white is a very traditional colour palate for kitchens. While all-white kitchens sound dreamy, this design can sometimes be difficult to pull off. A white kitchen can lead to a boring overall tone and texture if it’s not planned properly.

To ensure the hub of your home activity embraces the versatility of white instead of creating a humdrum kitchen design, check out the 12 tips below!

1. Play with different tones of white

To add depth to your kitchen, try painting it in multiple white tones. Going from cotton white walls to honeymilk cabinets may be a subtle difference barely noticeable to the naked eye, but this kind of paint job can make your kitchen seem less washed out. Off-white paint also plays nicely with purer whites, so consider painting your central island in something closer to an eggshell to make it pop.

Image Credit

2. Look for inspiration from nature

Rather than repainting everything with uniform coats of white, why not try materials that have natural white qualities? Swirled marbles or composite counters can give you that simple, unadorned quality while a white wood stain can make your organic materials feel like birch (without the wood’s natural softness).

3. Colour up your kitchen island

Wood-stained islands are features of many beautiful kitchens and often appear in white kitchens because of the rich contrast they provide. Before opting for a kitchen island that’s wood-stained, think about pairing a bright or richly-coloured island with your all-white kitchen. This kitchen design tip will add a whimsical and personalized feel to the room.

4. Throw in textures

Different textured materials will create natural variations in tone, even if all painted with the same brush. Try mixing tiles with stone or layering wood over paint or wallpaper.

5. Embrace the exposed design bones

The beauty of white from a design perspective is that it can give a “finished” feel to a design that embraces exposed beams, moulding and baseboard. Rustic or country kitchen designs particularly pop when you add a touch of white.

6. Don’t forget fabric

Don’t let your choice in table cloths or hand towels throw off your carefully planned decor. Choose white or white-complimenting linens for use in your kitchen.

Need some additional inspiration? Come by a Kitchen & Bath Classics showroom and see what you can do.

7. Install a white oven

White kitchen plans are white hot. So why not bring in white appliances as well? Break away from the stainless steel, and check out appliance units with a bright white finish as a fresh alternative. Ovens with white glass fronts would make an elegant addition to any kitchen.

8. Liven up your backsplash

A tile backsplash can add colour and texture to your kitchen. Although a white kitchen backsplash is an elegant idea, a backsplash doesn’t always have to be tile. A kitchen with a counter-level window instead of a tile splash is a great way to add colour and a view, especially if there’s a lively green garden right outside.

Image Credit

9. Paint the ceiling

Painting the ceiling is a great way to add some unexpected colour to an otherwise monochromatic white kitchen. Although most ceilings are painted a shade of white regardless of the wall colour in the room, you may want to switch things up. Consider your ceiling the fifth wall and ready for a pop of colour!

Perhaps consider an energetic yellow ceiling for a vibrant feel in a white kitchen. Or, you may want to create a more tranquil feeling for your kitchen with a blue ceiling. The sky (or the ceiling) is the limit!

10. Lay down a rug

One of the easiest kitchen colour ideas is to lay down a fun rug. Layering a rug on your kitchen floor is a simple way to introduce colour to your all-white kitchen design. A rug is also a way to add texture to the room.

If you’re worried about a possible tripping hazard that can come with layering a rug, consider installing a tile rug instead. This clever kitchen hack is a way to add colour while reducing any risk.

11. Add metal

An all-white kitchen can feel cold if your kitchen plans go awry. Warm up your white kitchen with metal accents. Copper, bronze, brass and polished nickel are all options to add warmth and even a touch of luxury if you choose gold.

Consider combining your metal accents with some colour as well. Pairing a single contrasting colour with metals can spark up a dramatic feel in an all-white kitchen. For instance, choose dark seating and gold light fixtures or vice versa for a sleek, contemporary vibe.

12. Put up wallpaper

Wallpapering a kitchen can be a bold and beautiful way to introduce colour to an all-white kitchen. Applying wallpaper to a single wall will create a dynamic focal point while also adding movement and dimension to the room.

White is an invigorating colour that creates a fresh and clean feeling. So, whether you’re in a smaller, simpler kitchen, a spacious vacation home kitchen or anything in between, a white kitchen is an excellent option. Check out your nearest Kitchen & Bath Classics showroom for white kitchen and other kitchen colour ideas.

Your Simple Guide to Successful Bathroom Renovations

Bathroom renovation tools

Bathrooms can be a personal oasis, key to your kid’s bedtime routine, and a big part of waking up and starting your day. Bathrooms used to be a very practical space, but today, they’re the perfect opportunity to personalize your home and increase its value. This is where bathroom renovations come in!

Bathroom renovations are one of the best ways to see a strong return on investment – but only if they are done right. To make sure your next remodel is a successful one, follow these do’s and don’ts when renovating a bathroom.

DO: Start Gathering Ideas

Before you start ripping down tile or removing fixtures, think about how you’d like your new bathroom to look. There are a surprising number of styles and aesthetic choices you could make. From industrial to neutral to rustic, the look and feel of your bathroom can be a reflection of your personal taste and the style of your home. Visit sites like Pinterest, Houzz and look through design magazines for bathroom ideas and inspiration.

You’ll also want to consider how big of a project this is going to be. Are you looking to simply replace a few fixtures, update the bathroom cabinets, and repaint? Or are you interested in a major overhaul? This will all be dependant on your budget and how much time and energy you’re willing to dedicate to the project.

And don’t forget to think of how your bathroom will be used. While it can be a place to relax, it also needs to be functional. For instance, does it need to be kid friendly? Perhaps double sinks would make your morning routine much easier? Or maybe you take regular baths and would love a new tub with jets? The possibilities are endless, so take some time to think of what is really important in your bathroom design.

Image Credit

DON’T: Do It Yourself

Bathrooms involve a complicated mix of plumbing, electrical and carpentry that most homeowners simply aren’t qualified to take on by themselves. If you’re looking to save some money on your bathroom renovation, consider taking on tasks such as painting, but leave the serious stuff to professionals.

Start by asking family and friends for recommendations. Chances are you know someone that has recently done a renovation or repairs to their home. Then research them online. Look for reviews, a better business bureau rating and see how many years they’ve been in business for. Once you’ve found a great candidate, make sure you check their certifications and experience.

Is your contractor certified? Here’s how to find out.

DO: Budget For The Unexpected

After you’ve found a contractor you trust, it’s time to talk budget. Your contractor should visit your home and walk through your bathroom with you. They will be able to point out any potential obstacles and even make suggestions. Next, they will provide you with a quote or estimate for how much they expect the project to cost. This estimate will likely only cover labor, so don’t forget about any additional materials you’ll need to purchase.

After they’ve provided you with an estimate, you’ll want to add another 10 to 15 percent on top of that price to cover any unexpected problems. Because your contractor can’t see what’s behind the walls, there is always a chance they’ll discover something once the renovation is underway. Common issues can range from water damage to venting issues to old pipes. This contingency will make sure you have the funds to cover whatever they might uncover.

DON’T: Forget About Water Efficiency

It’s easy to get caught up in the look of your bathroom, from tiles to fixtures to that fancy new jet tub. But don’t forget about water efficiency and sustainability. Water saving options are becoming the new standard and not only will they benefit the environment, you’ll save money on your utility bills too.

Furthermore, there are rebates available in Canada for everything from low flow toilets to lighting choices. Talk to your contractor about what they can do to make your bathroom more efficient.

ENERGY STAR rebates and incentives available in Canada

Remember bathroom storage

Image Credit

DO: Consider Storage

Storage might not be the first thing that comes to mind for a bathroom, but if you take a step back and think of all the things you keep in that space, you’ll see why it’s important. Hair-care products, hair dryers, make-up, personal grooming accessories, towels, cleaning supplies, the list goes on. The right storage solutions will help keep your bathroom tidy and free of clutter.

DON’T: Be Afraid to Change The Layout

Large or small, every bath needs a good floor plan. You want a space that is functional and easy to navigate while making the most of your square footage. Changing your bathroom design and the layout will definitely affect your budget, but the end result can be worth it.

If your bathroom is very outdated and awkward, it is likely worth the investment. Have extra space? Consider building a separate toilet compartment. If you like soaking, a separate tub could add the perfect amount of luxury. If you have room, you can even make space for some bathroom furniture.

DO: Think About Resale

Unless you’re confident that this is going to be your forever home, you’ll want to take into account how future families might use the space. For example, you might not be a bath person and would prefer to invest in an amazingly luxurious shower instead. But if you’re trying to sell your home in the future, the lack of a bathtub might be a deal breaker for some buyers.

As long as you have at least one tub in the house, it’s OK for resale purposes to eliminate a second tub. Of course, you want to make your bathroom perfect for you and your family, but keep resale in mind too.

If you need ideas and inspiration, stop by a Kitchen & Bath Classics showroom today and let our staff help you navigate the world of bathroom renovations.

Designing and Stocking Your First Apartment Bathroom

Your first apartment bathroom is basically a blank slate - make it your own!

There is nothing like getting the keys to your first, real apartment and finally moving in. The possibilities almost hang in the air, and it is incredibly exciting to have your own home. Many people select an abode so they can tackle renovation projects, namely in the kitchen or in the bathroom – spaces that are highly trafficked and utilized. So once the dust has settled and the boxes have been recycled, it is time to think about how best to redesign your first ever bathroom. Here are some tips to consider:

Start with the essentials
First, it can be extremely helpful to discuss your plans with a professional at a Kitchen & Baths Classics Showroom. He or she can point you in the right direction in terms of feasibility and budget; no one wants to discover that their dream room is unattainable. When you know what you would like to do, be sure that essential elements are covered. You may want to initially change the shower head to something more soothing or something stronger. Apartment Therapy writers added that you should then make a checklist of items, both functional and aesthetic to enhance your bathroom decor. On that list might be a shower curtain is a necessary evil in many bathroom spaces, so select one that is bold, bright and beautiful to match your look. Additionally, you will have to find a comfortable – and stable – bath mat, plus wall hooks and towel hangers. A good toilet seat is something you should invest in as well.

apartment, bathroomYour first apartment bathroom is full of renovation possibilities.

Choose your colours wisely
When you are ready to tackle the larger projects such as tiling or replacing the sink, think about the environment you hope to create. According to For Rent, it is a good idea to enhance the feeling of space, particularly if the room is a small one. Rather than installing a sink with cabinets below, look for a pedestal sink, preferably in a muted shade. If you have white tile, select a sink to match, otherwise look for something beige or off-white. You then have the opportunity to play with the background colour, but only if it makes sense: If the walls are darker, the room may feel smaller and more cramped, particularly if it does not have a window. The source noted to keep things airy and roomy, yellow is a good color to choose if white is not your thing.

No matter what, your new space will be uniquely yours, so have fun decorating. Let the bathroom be an expression of your personality; reflect it through the colours you choose, the decor you select and any quirky elements that speak to who you are.